I almost debated not putting this up because visually it was not as pleasing at it was tastefully. Then I thought, well what it tastes like is way more important than what it looks like so I couldn't just pass it up. I made the accident of not spraying enough oil on the bundt pan so as you can see obviously some of the cake was being very resistant on coming out of the pan.
When we were moving my mom found this recipe that was my Great Grandma's. Some of my family members like to believe she made this cake recipe for my Dad because of his so called egg allergy *cough cough* but we all know that's totally not true and it's more along the lines of because butter and eggs were expensive back in the day. So my Mom found the recipe and wanted me to make it because my dad loves apples, cinnamon, and anything in that general genre. He loved it and if you like that type of dessert you will too. I was just happy to be baking after my Saturday of plaster death. I plastered all the white area in this picture, then I got a blister and wanted to cry. This is why your boyfriend should never assign you a task to do all by yourself! Home improvement projects require at least 2 people. At least the next part of this will have an end result of some awesome wainscoting and sage green walls.
Eggless Applesauce Cake
Yield ~16 servings
1 1/4 cup sugar
2 1/4 cup flour
1/2 cup vegetable shortening
1 1/2 cups apple sauce
1 teaspoon cinnamon
1 teaspoon ground cloves
1 teaspoon nutmeg
2 teaspoons baking soda
2 tablespoons vinegar
1/2 teaspoon salt
1 cup raisins
Preheat oven to 350 degrees. Cream the shortening and sugar together. Next add in the flour, vinegar, and applesauce. Last mix the cinnamon, cloves, nutmeg, baking soda, salt, and raisins in. Bake 60 minutes or until a toothpick inserted comes out clean.
Monday, July 30, 2012
Friday, July 27, 2012
Beef Jerky- Honey BBQ and Lemongrass Chili
Most anyone that knows me knows I love beef jerky. I even got beef jerky as a birthday present. So when the idea to try to make my own arose, I quickly jumped on it and told my boyfriend to buy some meat! He came home with a 5 pound chunk of meat and we got to work. Meanwhile, we've had our oven on craigslist for a while now and the day before we planned on cooking it someone replied saying they'd come by the next day and pick it up. We never got another response back so we just cooked the jerky anyway. It's a really good thing they didn't write back because they would have come to a terrible mess of an oven. And now that they never answered we're probably just donating it now, along with the rest of the appliances. Our to do list this weekend is ridiculous, thus the weekend has been dubbed housework weekend. ALL weekend long we'll be doing things from fixing bathroom tile in both bathrooms, to sanding down kitchen walls, to cleaning the basement room, going to the dump, and the list is never ending. For once in my life, I may not be excited it's Friday.
Beef Jerky
Yield ~ a lot of servings
5 pound Eye Round (you can really use whatever cut you'd like), sliced
Honey BBQ
3 tablespoons honey
1 clove garlic, minced
1/2 cup ketchup
1 tablespoon cider vinegar
2 tablespoons soy sauce
1 tablespoon sugar
1 teaspoon chili powder
1/2 teaspoon siracha
Lemongrass Chili
1/2 ounce lemongrass, chopped
3 tablespoons fish sauce
3 tablespoon soy sauce
1 tablespoon ginger, minced
1/2 teaspoon siracha
1 tablespoon garlic powder
2 tablespoons sugar
1 tablespoon red curry paste
Slice the beef into thin slices. For each flavor, mix your ingredients together in a bowl. Place half the meat in each bowl and mix together making sure all the meat gets coated with the marinade. Place in a bag or tupperware over night so the flavors stick. The next day preheat your oven to 200 degrees. Place the slices of meat on the oven racks or you can do what we did for the second rack. We took a cooling rack and placed it on top of a cookie sheet so the juices wouldn't drip down to the bottom of the oven. Cook for 4 hours to completely dry out. You may need an additional 30 minutes. Let cool, then eat!
Wednesday, July 25, 2012
Ice Cream Cake
I am doing a horrible job of documenting the process of making whatever I make. I promise the next post will be better. I have the hustle and bustle of my sister's birthday to blame for it, right? Or maybe the fact that my car alarm remote decided to completely end it's life on me and the other one was MIA. I'm going to tell you this story just because it's that ridiculous.
Our evening started out by going to dinner in Fells Point in Baltimore. Everything is hunky dory then we go to Max's Taphouse for a brew before the Pirate Cruise. Mom and Dad decide to go to my car for the cooler and they call and say your remote doesn't work. I come (thinking it's to the rescue) but realize I don't have the special touch, the battery for the remote is dead, and Clifford (my car) hates me. I realize we can't go on the cruise without the tickets so I have to use my key to get in my car which means the alarm will go off. After 30 minutes of freaking out and trying to get all of my sister's friends to make the stupid thing go off we decide to disconnect the battery at least so Clifford shuts up while we're on the Pirate Cruise. We walk towards the cruise and someone (names not being given) tries to put my remote back on my key ring and it falls DOWN THE RAIN DRAIN through the grate about 10 inches below us. Fast forward 15 minutes of trying to get it out with gum and a stick, then a hanger. We finally have it back, go on the cruise then it's time to go. We reconnect the battery and all Clifford barking hell breaks lose again. What are we supposed to do? UH, nothing so we proceed to drive back a half hour with the alarm wailing. As we are trying to leave we stop since it's going off to see one last time if we can do something and we're blocking a road. Some drunk guy is trying to turn and proceeds to tell us he's a cop so one of our riders starts screaming SHOW US YOUR BADGE SHOW US YOUR BADGE. That obviously didn't help the situation but he wasn't a cop so it didn't really make a difference. So we start driving down 695 and 97 and luckily the alarm took short reprieves but never for long. I swore on my life that night we would have gotten pulled over and gone to jail for being menaces to society. This is pretty much how the drive went, with 6 people in my little mazda 3.
Mint Chocolate Chip Ice Cream Cake with Cookies and Cream Frosting
Yield ~16 servings
1/2 container of mint chocolate chip ice cream
2/3 pack vanilla cake mix
2/3 pack vanilla pudding mix (3.9 ounce)
3 eggs
2/3 cup oil
1/3 cup water
1/2 cup sour cream
1 stick butter
1/4 cup shortening
powdered sugar, for desired consistency
1 tablespoon vanilla extract
10 Oreo cookies, crushed
A day before you plan on assembling, line one of your 8 inch cake pans with aluminum foil. Fill it with your ice cream and spread it out so its evenly filled the pan. Place it back in the freezer until ready to use. When ready to bake, preheat oven to 350. In a bowl mix the cake mix and pudding, then add in the eggs, water, oil, and sour cream. Fill your other 2 8 inch cake pans with the batter and bake ~35 minutes or until golden on top. Take out of the oven and cool. To make your frosting, beat the room temp butter and shortening together. Next add in your vanilla and cookie crumbs. Last you can add in powdered sugar, a half cup at a time until you reach the consistency you prefer. You will need at least 2 cups.
To assemble, make sure the cakes are cool enough. Place a cake layer on your serving plate. Take the ice cream layer out of the cake pan and aluminum foil and place that on top, then place the last cake layer on top. Place it back in the freezer for 10 minutes just to make sure that the ice cream layer doesn't get too soft. Then you are ready to frost it, but you must make sure you frost it quickly (less than ten minutes). The one good thing is since the cake is cold the frosting sticks better and is easier to mold exactly how you'd like it. Keep in freezer until ready to serve then let sit about 10 minutes before you serve.
At least this is what it looked like by almost the end of the night. I'd say it was a success.
Friday, July 20, 2012
Banana Oreo Chocolate Cake Pops
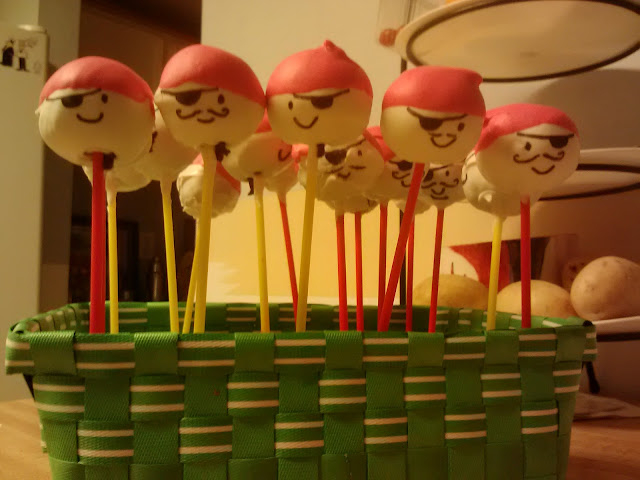
These might be my favorite cake pops I've ever made. Hopefully my sister doesn't actually read my blog today or the surprise will be ruined. We are going on the Urban Pirates cruise tonight after dinner for her birthday. I made these to get us in the spirit. I'm pretty darn excited to get all dressed up and play the part. I don't know how anyone wouldn't think this was the best idea ever and it's byob. I thought about making the pops look like her favorite animal then I realized nothing was more fitting than pirates so these were born. And of course I forgot my camera to show you all the other pics I took of making them. Let's be honest though, no one really cares about anything but the finished product anyway. A box of cake mix isn't going to get you a repin. Maybe, just maybe these little guys will get 1 repin. At least I hope :)
Banana Oreo Chocolate Cake Pops
Yield ~24 pops
1/2 package chocolate cake mix
1/2 package banana pudding mix (3.9 ounces)
1/2 vanilla frosting container
10 Oreo cookies
1/3 cup oil
1/2 cup water
1/4 cup sour cream
2 eggs
16 ounces candy melts
In a bowl mix the cake mix and pudding mix together to get rid of clumps. Then add in the oil, water, sour cream, and eggs. Mix together and pour into a cake pan (I used an 8x11). Bake for ~40 minutes or until set. Wait for cake to cool then crumble it into a bowl. Take your oreos and crush them in a bag or put them in the food processor, then pour them in the bowl. Last add half the vanilla frosting mixture and mix everything together. Take small handfuls and make the cake balls about 1 1/2 inches in diameter. Place them in the freezer to stiffen for a half hour. The rest is just the same as any other cake pop direction. You can read the directions from my other posting here. Just don't worry about the snitch wings!
If you're interested in making them to look like pirates you just need to melt another color of candy melts and redip them only halfway though. They make pens that you can write on candy and fondant with so I just used those to draw their faces.
Wednesday, July 18, 2012
Strawberry Rolls with Praline Glaze
Whenever I have to think of a new recipe my mind always floats away to desserts. I have to try really hard not to make a dessert. I don't exactly want a blog just about them plus my coworkers start to get slightly mad at me for bringing them in so frequently. Therefore I have to change it up every once in a while. I hadn't done a breakfast recipe in a long time so I figured I'd give it a whirl. Bisquick makes life so much easier. You don't have to think about all the extras like flour, baking soda, etc. It's just all there and perfect for so many recipes. So I took on the cinnamon roll with a twist. Obviously those are to die for but just adding in some jam instead is a nice change up. You can really do so much with these and make them any flavor you'd like. I've done raspberry jam with some orange zest as well which is really great too.
Strawberry Rolls with Praline Glaze
Yield ~12 rolls
3 cups bisquick
3/4 cup milk
2 tablespoons sour cream
3/4 cup milk
2 tablespoons sour cream
2 tablespoons sugar
1 cup strawberry jelly/jam (you can use any flavor to mix it up)
1 cup powdered sugar
3 tablespoons praline syrup (or 3 tablespoons cream mixed with 3 tablespoons brown sugar)
1 cup strawberry jelly/jam (you can use any flavor to mix it up)
1 cup powdered sugar
3 tablespoons praline syrup (or 3 tablespoons cream mixed with 3 tablespoons brown sugar)
In a bowl mix the bisquick, milk, sour cream, and sugar. Roll into a ball of dough. Sprinkle some extra bisquick on the counter and roll the dough out to a rectangle about 18 inches by 8 inches roughly. Spread your jelly or jam to cover the entire surface. Take one end of the long side and start rolling it up together to make the roll. Then cut sections about 2 inches long and place them on a greased cookie sheet. Bake for 15 minutes or until slightly golden. Let cool and make the glaze by mixing the powdered sugar and syrup or cream. Once they have cooled a bit drizzle the glaze on top.
Monday, July 16, 2012
Cucumber Salad
Why does Monday always come so quickly? Especially when that means my birthday weekend is officially over. Whomp whomp. I'd have to say my one of my favorite parts of the weekend was yesterday on the boat! The way to do wine on a boat is obviously with sippy cups! Those clouds I was so excited about ended up turning into some crazy storms and we were scrambling to get the boat in between lightning strikes. Most people would've been scared, I was creepily excited about it.
Well I knew it had to come to an end eventually so I'll leave you with a great refreshing summer side! Cucumber salad is awesome for so many of your meals during the summer. It would go great with some burgers, grilled chicken, or anything. It's even better if you've got them growing out in your garden. I actually got mine from my coworker since our garden is a little behind schedule this year. She came in with a huge paper bag and was like take what you want. I happily ended up with 2 cucumbers and 3 squash.
Cucumber Salad
Yield ~6 servings
2 large cucumbers, sliced
1/2 onion, sliced thinly
3/4 cup white vinegar
1/4 cup water
2 tablespoons sugar
1 tablespoon dill
1/4 teaspoon salt
1/2 tablespoon peppercorns
dash of red pepper flakes
Slice your cucumber and onions and place them in a bowl. Then mix in the vinegar, water, sugar, dill, peppercorns, and red pepper flakes. Place it all in a tupperware container for storage and shake it up to mix it together well.
Friday, July 13, 2012
Thai Chicken Burger
I'm pretty sure by now it's quite obvious that I mostly eat Asian, Mexican, and desserts. This is just another one of my many reasons why. So what do you do when you have a ton of chicken? Get creative, which in my mind meant grinding my own chicken breasts. I'm not sure why I thought this would be a fun idea. It much more resembled a horror movie if you catch my drift. 'Grinding Death of the Chicken Breast'... sure sounds like a good movie... If this kind of stuff doesn't slightly bother you then by all means grind away! Otherwise, just buy the preground chicken at the grocery store. At least once that was over it was smooth sailing and my dinner was spectacular. I almost wished I had saved this for tonight for my family birthday get together but no worries cause I know what we have instead will be just as great. I hope you all have a wonderful weekend and maybe get a chance to have one of these while hanging out on your back deck.
Thai Chicken Burgers
Yield ~4 burger
1 pound ground chicken (we actually ground 2 large chicken breasts)
1 cup carrots, grated
1/4 onion, diced small
1 tablespoon garlic, minced
1 tablespoon ginger, grated
juice of 1/2 a lime
1/2 teaspoon sesame oil
1 teaspoon siracha
1 teaspoon fish sauce
1 teaspoon soy sauce
2 tablespoons sesame seeds
Place the ground chicken in a bowl and put all the other ingredients in as well. Mix together and make 4 patties. Spray a pan with oil and place patties in at medium high heat. Cook for about 7 minutes on one side then flip and cook for another 7 minutes.
Wednesday, July 11, 2012
Peach Cream Pies
Guess what? It's July 11 which means Bastille Day is only 3 days away. I know you all can't wait for Bastille Day... me either cause it's my BIRTHDAY! I know! You can't handle your excitement either but some way we'll make it through together. Somehow these birthdays get less and less exciting every year. Last year I was in denial of turning a quarter century. To try and make it through the day I just wore a quarter on a necklace to at least bring some comedy to my day. Then the presents get less exciting too, mostly because I have no idea what to ask for. I can't even think of anything I need or want. All I asked for was this, this, and this. Talk about a boring birthday list. Maybe someone will surprise me with something I didn't even know I wanted! :)
Peach Cream Pies
Yield ~20
3/4 cup sugar
6 tablespoons butter
1 egg
1 1/2 cups flour
1/4 teaspoon salt
3/4 teaspoon baking powder
1/2 container Cool Whip
4 ounces cream cheese (room temp)
2 peaches, sliced
Preheat oven to 375 degrees. In a bowl cream together sugar and butter, then add in the egg. Next mix in the flour, salt, and baking powder. Put about 1 1/2 tablespoons dough in each mini muffin tin space. Dip your finger in flour or powdered sugar (so they don't stick to the dough) and press down in the middle of each opening so that they look like little shells to hold the filling. Bake ~8 minutes. Let the cookie shells cool and mix together the cream cheese and Cool Whip in a bowl. Place a dollop of the mixture into the center of each shell then place a couple slices of peach on top.
Monday, July 9, 2012
Key Lime Cookies
I've been so MIA lately, I apologize. Between 4th of July, birthdays, weddings it's hard to keep up with cooking. At least I got these babies in though. As usual when I make desserts I quickly try to bring them to work so they are not just sitting on my kitchen counter screaming "Ashley come eat us, please, you know you want toooooo" cause that's what they would have done... in addition to every other type of snack in my fridge and pantry including but not limited to chocolate chips, cool whip, laughing cow cheese wedges and so on. These were delectable though and my co-workers obviously agreed when 2 hours later they were all gone.
Key Lime Cookies
Yield ~36 cookies
4 tablespoons butter
2 tablespoon oil
1 1/2 cups sugar
1 egg
1 tablespoon Key Lime juice
1 1/4 cup flour
2 teaspoons lime zest
1/2 teaspoon baking powder
dash of salt
1 1/2 cups granola
Preheat oven to 350 degrees. Cream butter, oil, and sugar together. Add the egg, Key Lime juice, and lime zest. Last stir in the flour, baking powder, and salt. Put the granola in a bowl. Make balls of dough about 1- 1 1/2 inches in diameter then roll them in the granola then place on cookie sheet. Bake 15-18 minutes until slightly golden brown.
Tuesday, July 3, 2012
4th of July
In honor of 4th of July I'm taking a day off. As usual it's going to be a scorcher of 95 degrees with a chance of thunderstorms. I don't know how many times our fireworks have gotten rescheduled because of rain but it's probably half the time. At least we get a rain date!
In my second honor of 4th of July I'm bringing you the one thing I think about any time I think about 4th of July.
"He makes me melt like a popsicle of the 4th of July"
Oh Little Rascals, how I love you. Hopefully you all have a wonderful day tomorrow and get some good Ooooo's and Ahhhh's in. Unless you're my sister you probably will. When we were younger and went to the fireworks she didn't like them very much and just said "No oooooh, No ahhhh!"
Monday, July 2, 2012
Buttons and Bows
Is anyone else terribly ready for a vacation? Even though I just took one a month ago it seems so far. I'm already ready to get away. I need to take a personal vacation alone and just chill out. I'm sure that would be really great but I'd probably be bored by the second day. Maybe if I had my sister come then it would be better. Right about now she's one of the few people I could actually want to go away on a vacation with. I just need a break from life, how about you?
Speaking of my sister though... Sis was testing out recipes for a future brunch at her cafe. I was the lucky taste tester. Today I am featuring one of her recipes for breakfast! This only took me a few weeks... I mean months to post. I somehow sadly lost this posting in between all my others.
Buttons and Bows
Yield ~ 12
2 cups Bisquick mix
2 tablespoons sugar
1 teaspoon nutmeg
1/4 teaspoon cinnamon
1/3 cup milk
1 egg
1/4 cup butter, melted
1/2 cup sugar
Preheat oven to 400 degrees. Mix together bisquick, sugar, nutmeg, cinnamon, milk, and egg to make a dough. Sprinkle flat surface with some extra bisquick and knead the dough a few times and roll it out. To make the bows you can cut strips and just fold one piece over the other. Otherwise you can just make the buttons which are just little balls of dough and place them on a cookie sheet. Bake 8 to 10 minutes then immediately brush them with the melted butter then sprinkle the sugar on them. If you do not have a brush (along the lines of marinade brush) you can dip them halfway in the melted butter.
Subscribe to:
Posts (Atom)